——springboot Web开发和模板引擎thymeleaf语法使用 | Nickの博客")
SpringBoot:Web开发
1、简介
使用SpringBoot;
1)、创建SpringBoot应用,选中我们需要的模块;
2)、SpringBoot已经默认将这些场景配置好了,只需要在配置文件中指定少量配置就可以运行起来
3)、自己编写业务代码;
自动配置原理?
这个场景SpringBoot帮我们配置了什么?能不能修改?能修改哪些配置?能不能扩展?xxx
xxxxAutoConfiguration:帮我们给容器中自动配置组件;
xxxxProperties:配置类来封装配置文件的内容;
2、SpringBoot对静态资源的映射规则(自动配置);
@ConfigurationProperties(prefix = "spring.resources", ignoreUnknownFields = false)
public class ResourceProperties implements ResourceLoaderAware {
  //可以设置和静态资源有关的参数,缓存时间等
    WebMvcAuotConfiguration:
        @Override
        public void addResourceHandlers(ResourceHandlerRegistry registry) {
            if (!this.resourceProperties.isAddMappings()) {
                logger.debug("Default resource handling disabled");
                return;
            }
            Integer cachePeriod = this.resourceProperties.getCachePeriod();
            if (!registry.hasMappingForPattern("/webjars/**")) {
                customizeResourceHandlerRegistration(
                        registry.addResourceHandler("/webjars/**")
                                .addResourceLocations(
                                        "classpath:/META-INF/resources/webjars/")
                        .setCachePeriod(cachePeriod));
            }
            String staticPathPattern = this.mvcProperties.getStaticPathPattern();
            //静态资源文件夹映射
            if (!registry.hasMappingForPattern(staticPathPattern)) {
                customizeResourceHandlerRegistration(
                        registry.addResourceHandler(staticPathPattern)
                                .addResourceLocations(
                                        this.resourceProperties.getStaticLocations())
                        .setCachePeriod(cachePeriod));
            }
        }

        //配置欢迎页映射
        @Bean
        public WelcomePageHandlerMapping welcomePageHandlerMapping(
                ResourceProperties resourceProperties) {
            return new WelcomePageHandlerMapping(resourceProperties.getWelcomePage(),
                    this.mvcProperties.getStaticPathPattern());
        }

       //配置喜欢的图标
        @Configuration
        @ConditionalOnProperty(value = "spring.mvc.favicon.enabled", matchIfMissing = true)
        public static class FaviconConfiguration {

            private final ResourceProperties resourceProperties;

            public FaviconConfiguration(ResourceProperties resourceProperties) {
                this.resourceProperties = resourceProperties;
            }

            @Bean
            public SimpleUrlHandlerMapping faviconHandlerMapping() {
                SimpleUrlHandlerMapping mapping = new SimpleUrlHandlerMapping();
                mapping.setOrder(Ordered.HIGHEST_PRECEDENCE + 1);
                //所有  **/favicon.ico
                mapping.setUrlMap(Collections.singletonMap("**/favicon.ico",
                        faviconRequestHandler()));
                return mapping;
            }

            @Bean
            public ResourceHttpRequestHandler faviconRequestHandler() {
                ResourceHttpRequestHandler requestHandler = new ResourceHttpRequestHandler();
                requestHandler
                        .setLocations(this.resourceProperties.getFaviconLocations());
                return requestHandler;
            }

        }
==1)、所有 /webjars/** ,都去 classpath:/META-INF/resources/webjars/ 找资源;==
webjars:以jar包的方式引入静态资源;
http://www.webjars.org/
localhost:8080/webjars/jquery/3.3.1/jquery.js
<!--引入jquery-webjar-->在访问的时候只需要写webjars下面资源的名称即可
        <dependency>
            <groupId>org.webjars</groupId>
            <artifactId>jquery</artifactId>
            <version>3.3.1</version>
        </dependency>
==2)、"/**" 访问当前项目的任何资源,都去(静态资源的文件夹)找映射==
"classpath:/META-INF/resources/",
"classpath:/resources/",
"classpath:/static/",
"classpath:/public/"
"/":当前项目的根路径
localhost:8080/abc === 去静态资源文件夹里面找abc
==3)、欢迎页; 静态资源文件夹下的所有index.html页面;被"/**"映射;==
localhost:8080/ 找index页面
==4)、所有的 **/favicon.ico 都是在静态资源文件下找;==
3、模板引擎
JSP、Velocity、Freemarker、Thymeleaf
[外链图片转存失败,源站可能有防盗链机制,建议将图片保存下来直接上传(img-zIrQuLSD-1589967749790)(images/template-engine.png)]
SpringBoot推荐的Thymeleaf;
语法更简单,功能更强大;
1、引入thymeleaf;
        <dependency>
            <groupId>org.springframework.boot</groupId>
            <artifactId>spring-boot-starter-thymeleaf</artifactId>
        </dependency>

<properties>
        <thymeleaf.version>3.0.9.RELEASE</thymeleaf.version>
        <!-- 布局功能的支持程序  thymeleaf3主程序  layout2以上版本 -->
        <!-- thymeleaf2   layout1-->
        <thymeleaf-layout-dialect.version>2.2.2</thymeleaf-layout-dialect.version>
  </properties>
2、Thymeleaf使用
默认配置
@ConfigurationProperties(prefix = "spring.thymeleaf")
public class ThymeleafProperties {

    private static final Charset DEFAULT_ENCODING = Charset.forName("UTF-8");

    private static final MimeType DEFAULT_CONTENT_TYPE = MimeType.valueOf("text/html");

    public static final String DEFAULT_PREFIX = "classpath:/templates/";

    public static final String DEFAULT_SUFFIX = ".html";
    //
只要我们把HTML页面放在classpath:/templates/,thymeleaf就能自动渲染;
使用:
1、导入thymeleaf的名称空间
<html lang="en" xmlns:th="http://www.thymeleaf.org">
2、使用thymeleaf语法;
<!DOCTYPE html>
<html lang="en" xmlns:th="http://www.thymeleaf.org">
<head>
    <meta charset="UTF-8">
    <title>Title</title>
</head>
<body>
    <h2>成功!</h2>
    <!--th:text 将div里面的文本内容设置为 -->
    <div th:text="${hello}">这是显示欢迎信息</div>
</body>
</html>
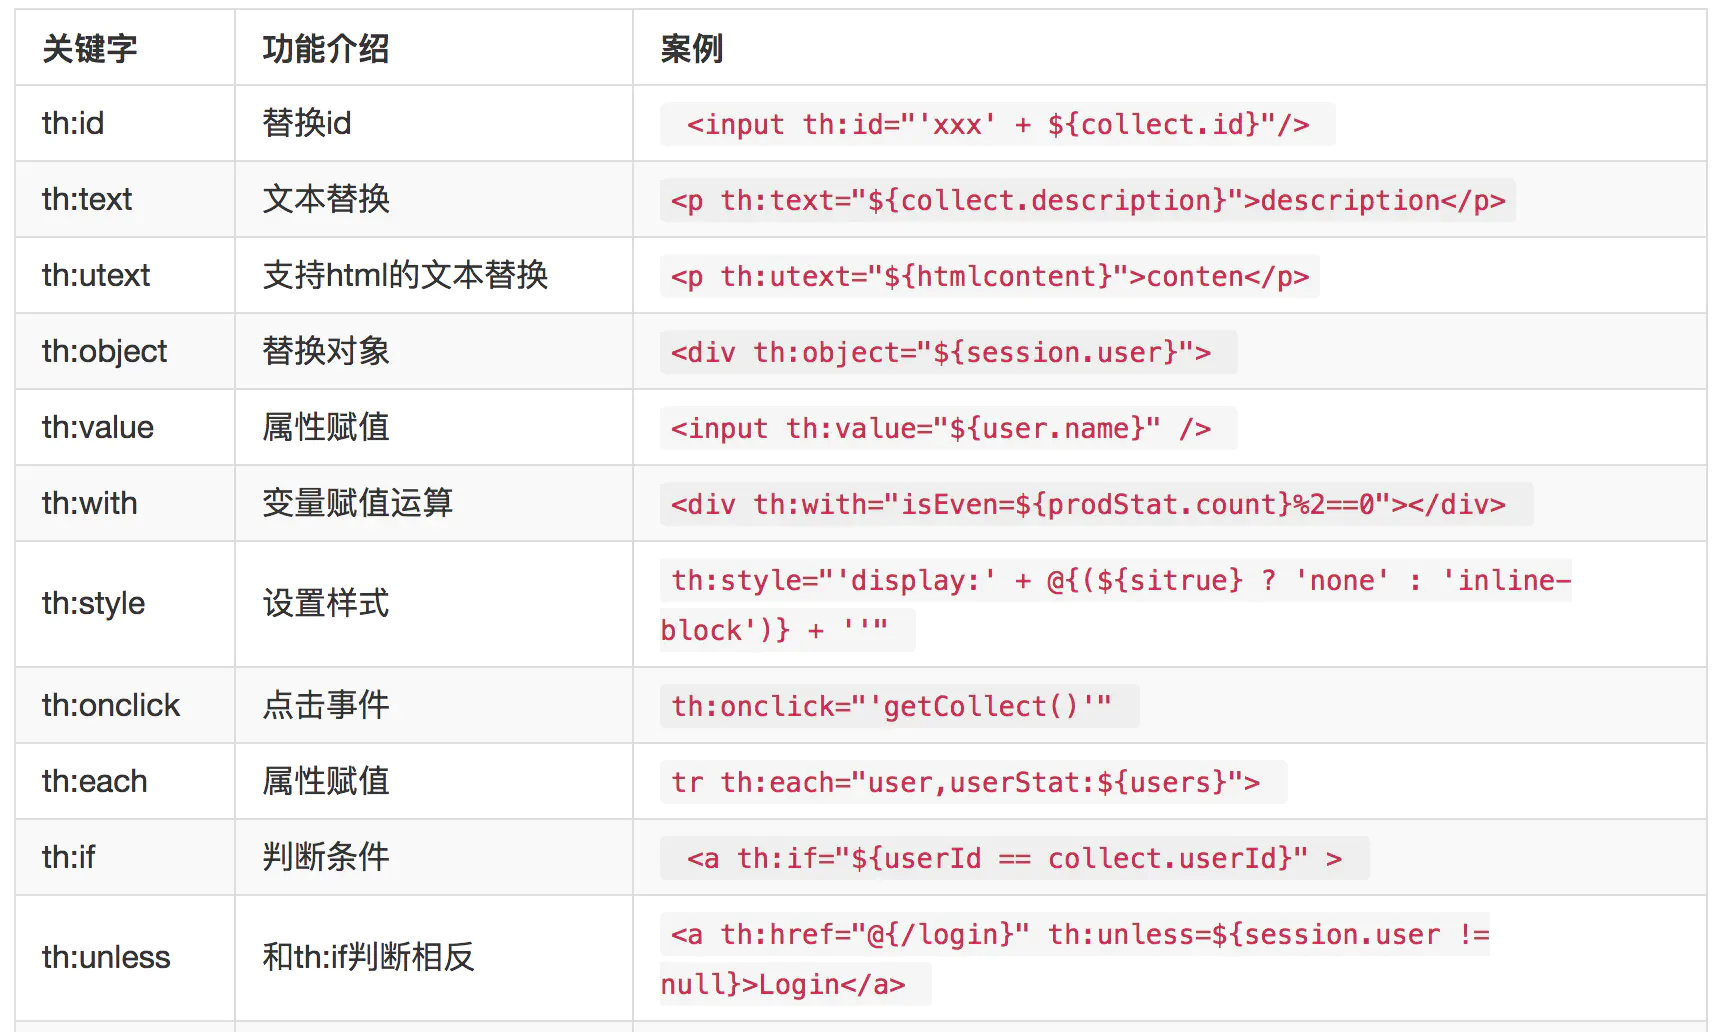
3、语法规则
参照:https://www.cnblogs.com/itdragon/archive/2018/04/13/8724291.html
1)、th:text;改变当前元素里面的文本内容;
th:任意html属性;来替换原生属性的值
2)、标准表达式语法:
${...} 变量表达式,Variable Expressions
@{...} 链接表达式,Link URL Expressions
#{...} 消息表达式,Message Expressions
~{...} 代码块表达式,Fragment Expressions
*{...} 选择变量表达式,Selection Variable Expressions
1. ~{...} 代码块表达式
支持两种语法结构
推荐:~{templatename::fragmentname}
支持:~{templatename::#id}
templatename:模版名,Thymeleaf会根据模版名解析完整路径:/resources/templates/templatename.html,要注意文件的路径。
fragmentname:片段名,Thymeleaf通过th:fragment声明定义代码块,即:th:fragment="fragmentname"
id:HTML的id选择器,使用时要在前面加上#号,不支持class选择器。
代码块表达式的使用
代码块表达式需要配合th属性(th:insert,th:replace,th:include)一起使用。
th:insert:将代码块片段整个插入到使用了th:insert的HTML标签中,
th:replace:将代码块片段整个替换使用了th:replace的HTML标签中,
th:include:将代码块片段包含的内容插入到使用了th:include的HTML标签中,
2. #{...} 消息表达式
消息表达式一般用于国际化的场景。
3. @{...} 链接表达式
链接表达式好处
不管是静态资源的引用,form表单的请求,凡是链接都可以用@{...} 。这样可以动态获取项目路径,即便项目名变了,依然可以正常访问
链接表达式结构
无参:@{/xxx}
有参:@{/xxx(k1=v1,k2=v2)} 对应url结构:xxx?k1=v1&k2=v2
引入本地资源:@{/项目本地的资源路径}
引入外部资源:@{/webjars/资源在jar包中的路径}
列举:
<link th:href="@{/webjars/bootstrap/4.0.0/css/bootstrap.css}" rel="stylesheet">
<link th:href="@{/main/css/itdragon.css}" rel="stylesheet">
<form class="form-login" th:action="@{/user/login}" th:method="post" >
<a class="btn btn-sm" th:href="@{/login.html(l='zh_CN')}">中文</a>
<a class="btn btn-sm" th:href="@{/login.html(l='en_US')}">English</a>
4. ${...} 变量表达式
4.1 变量表达式功能
一、可以获取对象的属性和方法
二、可以使用ctx,vars,locale,request,response,session,servletContext内置对象
三、可以使用dates,numbers,strings,objects,arrays,lists,sets,maps等内置方法(重点介绍)
4.2 常用的内置对象
一、ctx :上下文对象。
二、vars :上下文变量。
三、locale:上下文的语言环境。
四、request:(仅在web上下文)的 HttpServletRequest 对象。
五、response:(仅在web上下文)的 HttpServletResponse 对象。
六、session:(仅在web上下文)的 HttpSession 对象。
七、servletContext:(仅在web上下文)的 ServletContext 对象
这里以常用的Session举例,用户刊登成功后,会把用户信息放在Session中,Thymeleaf通过内置对象将值从session中获取。
// java 代码将用户名放在session中
session.setAttribute("userinfo",username);
// Thymeleaf通过内置对象直接获取
th:text="${session.userinfo}"
4.3 常用的内置方法
一、strings:字符串格式化方法,常用的Java方法它都有。比如:equals,equalsIgnoreCase,length,trim,toUpperCase,toLowerCase,indexOf,substring,replace,startsWith,endsWith,contains,containsIgnoreCase等
二、numbers:数值格式化方法,常用的方法有:formatDecimal等
三、bools:布尔方法,常用的方法有:isTrue,isFalse等
四、arrays:数组方法,常用的方法有:toArray,length,isEmpty,contains,containsAll等
五、lists,sets:集合方法,常用的方法有:toList,size,isEmpty,contains,containsAll,sort等
六、maps:对象方法,常用的方法有:size,isEmpty,containsKey,containsValue等
七、dates:日期方法,常用的方法有:format,year,month,hour,createNow等
4、SpringMVC自动配置
https://docs.spring.io/spring-boot/docs/1.5.10.RELEASE/reference/htmlsingle/#boot-features-developing-web-applications
1. Spring MVC auto-configuration
https://docs.spring.io/spring-boot/docs/1.5.10.RELEASE/reference/htmlsingle/#boot-features-developing-web-applications
Spring Boot 自动配置好了SpringMVC
2、扩展SpringMVC
    <mvc:view-controller path="/hello" view-name="success"/>
    <mvc:interceptors>
        <mvc:interceptor>
            <mvc:mapping path="/hello"/>
            <bean></bean>
        </mvc:interceptor>
    </mvc:interceptors>
==编写一个配置类(@Configuration),是WebMvcConfigurerAdapter类型;不能标注@EnableWebMvc==;
既保留了所有的自动配置,也能用我们扩展的配置;
//使用WebMvcConfigurerAdapter可以来扩展SpringMVC的功能
@Configuration
public class MyMvcConfig extends WebMvcConfigurerAdapter {

    @Override
    public void addViewControllers(ViewControllerRegistry registry) {
       // super.addViewControllers(registry);
        //浏览器发送 /atguigu 请求来到 success
        registry.addViewController("/kt").setViewName("success");
    }
}
3、全面接管SpringMVC;
SpringBoot对SpringMVC的自动配置不需要了,所有都是我们自己配置;所有的SpringMVC的自动配置都失效了
我们需要在配置类中添加@EnableWebMvc即可;
//使用WebMvcConfigurerAdapter可以来扩展SpringMVC的功能
@EnableWebMvc
@Configuration
public class MyMvcConfig extends WebMvcConfigurerAdapter {

    @Override
    public void addViewControllers(ViewControllerRegistry registry) {
       // super.addViewControllers(registry);
        //浏览器发送 /atguigu 请求来到 success
        registry.addViewController("/atguigu").setViewName("success");
    }
}
原理:
为什么@EnableWebMvc自动配置就失效了;
1)@EnableWebMvc的核心
@Import(DelegatingWebMvcConfiguration.class)
public @interface EnableWebMvc {
2)、
@Configuration
public class DelegatingWebMvcConfiguration extends WebMvcConfigurationSupport {
3)、
@Configuration
@ConditionalOnWebApplication
@ConditionalOnClass({ Servlet.class, DispatcherServlet.class,
        WebMvcConfigurerAdapter.class })
//容器中没有这个组件的时候,这个自动配置类才生效
@ConditionalOnMissingBean(WebMvcConfigurationSupport.class)
@AutoConfigureOrder(Ordered.HIGHEST_PRECEDENCE + 10)
@AutoConfigureAfter({ DispatcherServletAutoConfiguration.class,
        ValidationAutoConfiguration.class })
public class WebMvcAutoConfiguration {
4)、@EnableWebMvc将WebMvcConfigurationSupport组件导入进来;
5)、导入的WebMvcConfigurationSupport只是SpringMVC最基本的功能;
5、如何修改SpringBoot的默认配置
模式:
1)、SpringBoot在自动配置很多组件的时候,先看容器中有没有用户自己配置的(@Bean、@Component)如果有就用用户配置的,如果没有,才自动配置;如果有些组件可以有多个(ViewResolver)将用户配置的和自己默认的组合起来;
2)、在SpringBoot中会有非常多的xxxConfigurer帮助我们进行扩展配置
3)、在SpringBoot中会有很多的xxxCustomizer帮助我们进行定制配置
6、RestfulCRUD
1)、默认访问首页
/*
在Spring 5.0 中,已经将 WebMvcConfigurerAdapter 抽象类加上 @Deprecated 注解 记为过时。
* extends WebMvcConfigurerAdapter  替换为 implements WebMvcConfigurer 即可
* */
@Configuration
public class MyMvcConfig implements WebMvcConfigurer {
    @Override
    public void addViewControllers(ViewControllerRegistry registry) {
        registry.addViewController("/kt").setViewName("success");
    }

    //所有的WebMvcConfigurerAdapter组件都会一起起作用
    @Bean //将组件注册在容器
    public WebMvcConfigurerAdapter webMvcConfigurerAdapter() {
        WebMvcConfigurerAdapter adapter = new WebMvcConfigurerAdapter() {
            @Override
            public void addViewControllers(ViewControllerRegistry registry) {
                registry.addViewController("/").setViewName("login");
                registry.addViewController("/index.html").setViewName("login");
//                registry.addViewController("/main.html").setViewName("dashboard");
            }

            //注册拦截器
            @Override
            public void addInterceptors(InterceptorRegistry registry) {
                //super.addInterceptors(registry);
                //静态资源;  *.css , *.js
                //SpringBoot已经做好了静态资源映射
//                registry.addInterceptor(new LoginHandlerInterceptor()).addPathPatterns("/**")
//                        .excludePathPatterns("/index.html","/","/user/login");
            }
        };
        return adapter;
    }

    @Bean
    public LocaleResolver localeResolver() {
        return new MyLocaleResolver();
    }

}
2)、国际化
1)、编写国际化配置文件;
2)、使用ResourceBundleMessageSource管理国际化资源文件
3)、在页面使用fmt:message取出国际化内容
步骤:
1)、编写国际化配置文件,抽取页面需要显示的国际化消息
[外链图片转存失败,源站可能有防盗链机制,建议将图片保存下来直接上传(img-Adp1p44P-1589967749798)(images/搜狗截图20180211130721.png)]
2)、SpringBoot自动配置好了管理国际化资源文件的组件;
@ConfigurationProperties(prefix = "spring.messages")
public class MessageSourceAutoConfiguration {

    /**
     * Comma-separated list of basenames (essentially a fully-qualified classpath
     * location), each following the ResourceBundle convention with relaxed support for
     * slash based locations. If it doesn't contain a package qualifier (such as
     * "org.mypackage"), it will be resolved from the classpath root.
     */
    private String basename = "messages";
    //我们的配置文件可以直接放在类路径下叫messages.properties;

    @Bean
    public MessageSource messageSource() {
        ResourceBundleMessageSource messageSource = new ResourceBundleMessageSource();
        if (StringUtils.hasText(this.basename)) {
            //设置国际化资源文件的基础名(去掉语言国家代码的)
            messageSource.setBasenames(StringUtils.commaDelimitedListToStringArray(
                    StringUtils.trimAllWhitespace(this.basename)));
        }
        if (this.encoding != null) {
            messageSource.setDefaultEncoding(this.encoding.name());
        }
        messageSource.setFallbackToSystemLocale(this.fallbackToSystemLocale);
        messageSource.setCacheSeconds(this.cacheSeconds);
        messageSource.setAlwaysUseMessageFormat(this.alwaysUseMessageFormat);
        return messageSource;
    }
3)、去页面获取国际化的值;
![[外链图片转存失败,源站可能有防盗链机制,建议将图片保存下来直接上传(img-mhipKttU-1589967749818)(images/搜狗截图20180211134506.png)]](https://qiniu.qkongtao.cn/2023/03/20230316165047-aa511.png?imageView2/0/format/webp/q/75)
<!DOCTYPE html>
<html lang="en" xmlns:th="http://www.thymeleaf.org">
<head>
    <meta http-equiv="Content-Type" content="text/html; charset=UTF-8">
    <meta name="viewport" content="width=device-width, initial-scale=1, shrink-to-fit=no">
    <meta name="description" content="">
    <meta name="author" content="">
    <title>Signin Template for Bootstrap</title>
    <!-- Bootstrap core CSS -->
    <link href="asserts/css/bootstrap.min.css" rel="nofollow noopener"  rel="stylesheet">
    <!-- Custom styles for this template -->
    <link href="asserts/css/signin.css" rel="nofollow noopener"  rel="stylesheet">
</head>

<body class="text-center">
<form class="form-signin" action="dashboard.html">
    <img class="mb-4" src="asserts/img/bootstrap-solid.svg" alt="" width="72" height="72">
    <h2 class="h4 mb-3 font-weight-normal" th:text="#{login.tip}">Please sign in</h2>
    <label class="sr-only" th:text="#{login.username}">Username</label>
    <input type="text" class="form-control" th:placeholder="#{login.username}" placeholder="Username" required=""
           autofocus="">
    <label class="sr-only" th:text="#{login.password}">Password</label>
    <input type="password" class="form-control" placeholder="Password" th:placeholder="#{login.password}" required="">
    <div class="checkbox mb-3">
        <label>
            <input type="checkbox" value="remember-me"> [[#{login.remember}]]
        </label>
    </div>
    <button class="btn btn-lg btn-primary btn-block" type="submit" th:text="#{login.btn}">Sign in</button>
    <p class="mt-5 mb-3 text-muted">© 2017-2018</p>
    <a class="btn btn-sm" th:href="@{/index.html(l='zh_CN')}" rel="nofollow noopener" >中文</a>
    <a class="btn btn-sm" th:href="@{/index.html(l='en_US')}" rel="nofollow noopener" >English</a>
</form>

</body>

</html>
效果:根据浏览器语言设置的信息切换了国际化;
原理:
国际化Locale(区域信息对象);LocaleResolver(获取区域信息对象);
        @Bean
        @ConditionalOnMissingBean
        @ConditionalOnProperty(prefix = "spring.mvc", name = "locale")
        public LocaleResolver localeResolver() {
            if (this.mvcProperties
                    .getLocaleResolver() == WebMvcProperties.LocaleResolver.FIXED) {
                return new FixedLocaleResolver(this.mvcProperties.getLocale());
            }
            AcceptHeaderLocaleResolver localeResolver = new AcceptHeaderLocaleResolver();
            localeResolver.setDefaultLocale(this.mvcProperties.getLocale());
            return localeResolver;
        }
默认的就是根据请求头带来的区域信息获取Locale进行国际化
4)、点击链接切换国际化
/**
 * 可以在连接上携带区域信息
 */
public class MyLocaleResolver implements LocaleResolver {

    @Override
    public Locale resolveLocale(HttpServletRequest request) {
        String l = request.getParameter("l");
        Locale locale = Locale.getDefault();
        if(!StringUtils.isEmpty(l)){
            String[] split = l.split("_");
            locale = new Locale(split[0],split[1]);
        }
        return locale;
    }

    @Override
    public void setLocale(HttpServletRequest request, HttpServletResponse response, Locale locale) {

    }
}


 @Bean
    public LocaleResolver localeResolver(){
        return new MyLocaleResolver();
    }
}
3)、登陆
开发期间模板引擎页面修改以后,要实时生效
1)、禁用模板引擎的缓存
# 禁用缓存
spring.thymeleaf.cache=false
2)、页面修改完成以后ctrl+f9:重新编译;
登陆错误消息的显示
<p style="color: red" th:text="${msg}" th:if="${not #strings.isEmpty(msg)}"></p>
注意:
==
在resources文件夹或与其并列的文件夹下建立public文件夹,在public文件夹下的html文件可以通过浏览器中输入文件+后缀名的方式直接访问的.
一、public文件夹,就相当于在eclipse的web项目中的web-inf文件夹外的文件,是不需要通过服务器内部进行访问的。
二、templates文件夹,是放置模板文件的,因此需要视图解析器来解析它。所以必须通过服务器内部进行访问,也就是要走控制器--服务--视图解析器这个流程才行。
三、static文件夹,既不能直接访问,也不能通过服务器访问到。因此,这个文件夹,可能是放一些css、图片这样的文件供服务器内部引用。
==

