| Nickの博客")
vue实例的生命周期
- 什么是生命周期:从Vue实例创建、运行、到销毁期间,总是伴随着各种各样的事件,这些事件,统称为生命周期!
- 生命周期钩子:就是生命周期事件的别名而已;
- 生命周期钩子 = 生命周期函数 = 生命周期事件
- 主要的生命周期函数分类:
- 创建期间的生命周期函数:
- beforeCreate:实例刚在内存中被创建出来,此时,还没有初始化好 data 和 methods 属性
- created:实例已经在内存中创建OK,此时 data 和 methods 已经创建OK,此时还没有开始 编译模板
- beforeMount:此时已经完成了模板的编译,但是还没有挂载到页面中
- mounted:此时,已经将编译好的模板,挂载到了页面指定的容器中显示
- 运行期间的生命周期函数:
- beforeUpdate:状态更新之前执行此函数, 此时 data 中的状态值是最新的,但是界面上显示的 数据还是旧的,因为此时还没有开始重新渲染DOM节点
- updated:实例更新完毕之后调用此函数,此时 data 中的状态值 和 界面上显示的数据,都已经完成了更新,界面已经被重新渲染好了!
- 销毁期间的生命周期函数:
- beforeDestroy:实例销毁之前调用。在这一步,实例仍然完全可用。
- destroyed:Vue 实例销毁后调用。调用后,Vue 实例指示的所有东西都会解绑定,所有的事件监听器会被移除,所有的子实例也会被销毁。
生命周期函数演示
<body>
  <div id="app">
    <input type="button" value="修改msg" @click="msg='No'">
    <h4 id="h4">{{ msg }}</h4>
  </div>

  <script>
    // 创建 Vue 实例,得到 ViewModel
    var vm = new Vue({
      el: '#app',
      data: {
        msg: 'ok'
      },
      methods: {
        show() {
          console.log('执行了show方法')
        }
      },
      beforeCreate() { // 这是我们遇到的第一个生命周期函数,表示实例完全被创建出来之前,会执行它
        // console.log(this.msg)
        // this.show()
        // 注意: 在 beforeCreate 生命周期函数执行的时候,data 和 methods 中的 数据都还没有没初始化
      },
      created() { // 这是遇到的第二个生命周期函数
        // console.log(this.msg)
        // this.show()
        //  在 created 中,data 和 methods 都已经被初始化好了!
        // 如果要调用 methods 中的方法,或者操作 data 中的数据,最早,只能在 created 中操作
      },
      beforeMount() { // 这是遇到的第3个生命周期函数,表示 模板已经在内存中编辑完成了,但是尚未把 模板渲染到 页面中
        // console.log(document.getElementById('h4').innerText)
        // 在 beforeMount 执行的时候,页面中的元素,还没有被真正替换过来,只是之前写的一些模板字符串
      },
      mounted() { // 这是遇到的第4个生命周期函数,表示,内存中的模板,已经真实的挂载到了页面中,用户已经可以看到渲染好的页面了
        // console.log(document.getElementById('h4').innerText)
        // 注意: mounted 是 实例创建期间的最后一个生命周期函数,当执行完 mounted 就表示,实例已经被完全创建好了,此时,如果没有其它操作的话,这个实例,就静静的 躺在我们的内存中,一动不动
      },


      // 接下来的是运行中的两个事件
      beforeUpdate() { // 这时候,表示 我们的界面还没有被更新【数据被更新了吗?  数据肯定被更新了】
        /* console.log('界面上元素的内容:' + document.getElementById('h4').innerText)
        console.log('data 中的 msg 数据是:' + this.msg) */
        // 得出结论: 当执行 beforeUpdate 的时候,页面中的显示的数据,还是旧的,此时 data 数据是最新的,页面尚未和 最新的数据保持同步
      },
      updated() {
        console.log('界面上元素的内容:' + document.getElementById('h4').innerText)
        console.log('data 中的 msg 数据是:' + this.msg)
        // updated 事件执行的时候,页面和 data 数据已经保持同步了,都是最新的
      }
    });
  </script>
</body>
vue-resource 实现 get, post, jsonp请求
除了 vue-resource 之外,还可以使用 axios 的第三方包实现实现数据的请求
1. 之前的学习中,如何发起数据请求?
2. 常见的数据请求类型? get post jsonp
3. 测试的URL请求资源地址:
+ get请求地址: http://www.liulongbin.top:3005/api/get
+ post请求地址:http://www.liulongbin.top:3005/api/post
+ jsonp请求地址:http://www.liulongbin.top:3005/api/jsonp
4. JSONP的实现原理
+ 由于浏览器的安全性限制,不允许AJAX访问 协议不同、域名不同、端口号不同的 数据接口,浏览器认为这种访问不安全;
+ 可以通过动态创建script标签的形式,把script标签的src属性,指向数据接口的地址,因为script标签不存在跨域限制,这种数据获取方式,称作JSONP(注意:根据JSONP的实现原理,知晓,JSONP只支持Get请求);
+ 具体实现过程:
- 先在客户端定义一个回调方法,预定义对数据的操作;
- 再把这个回调方法的名称,通过URL传参的形式,提交到服务器的数据接口;
- 服务器数据接口组织好要发送给客户端的数据,再拿着客户端传递过来的回调方法名称,拼接出一个调用这个方法的字符串,发送给客户端去解析执行;
- 客户端拿到服务器返回的字符串之后,当作Script脚本去解析执行,这样就能够拿到JSONP的数据了;
- vue-resource 的配置步骤:
- 直接在页面中,通过script标签,引入 vue-resource 的脚本文件;
- 注意:引用的先后顺序是:先引用 Vue 的脚本文件,再引用 vue-resource 的脚本文件;
- 发送get请求:
getInfo() { // get 方式获取数据
  this.$http.get('http://www.liulongbin.top:3005/api/get').then(res => {
    console.log(res.body);
  })
}
- 发送post请求:
postInfo() {
  var url = 'http://www.liulongbin.top:3005/api/post';
  // post 方法接收三个参数:
  // 参数1: 要请求的URL地址
  // 参数2: 要发送的数据对象
  // 参数3: 指定post提交的编码类型为 application/x-www-form-urlencoded
  this.$http.post(url, { name: 'zs' }, { emulateJSON: true }).then(res => {
    console.log(res.body);
  });
}
- 发送JSONP请求获取数据:
jsonpInfo() { // JSONP形式从服务器获取数据
  var url = 'http://www.liulongbin.top:3005/api/jsonp';
  this.$http.jsonp(url).then(res => {
    console.log(res.body);
  });
}
Vue中的动画
为什么要有动画:动画能够提高用户的体验,帮助用户更好的理解页面中的功能;
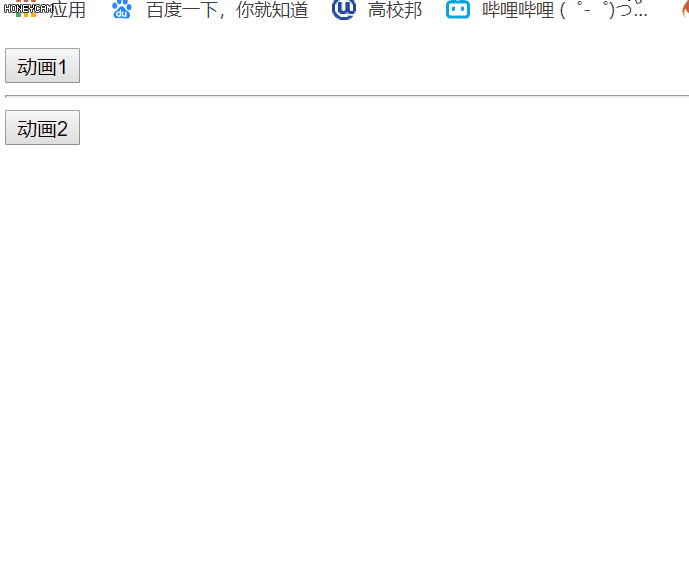
使用过渡类名
- HTML结构:
<div id="app">
        <input type="button" @click="flag=!flag" value="动画1">
        <transition>
            <h2 v-if="flag">我要动画效果</h2>
        </transition>
        <hr>
        <input type="button" value="动画2" @click="flag2=!flag2">
        <transition name="my">
            <h6 v-if="flag2">俺也要动画效果</h6>
        </transition>
    </div>
- VM 实例:
// 创建 Vue 实例,得到 ViewModel
var vm = new Vue({
            el: '#app',
            data: {
                flag: false,
                flag2: false

            },
            methods: {}
        })
- 定义两组类样式:
/* 定义进入和离开时候的过渡状态 */
    .v-enter,
        .v-leave-to {
            opacity: 0;
            transform: translateX(150px);
        }

        .v-enter-active,
        .v-leave-active {
            transition: all 0.8s ease;
        }
 /* 使用自定义名字 */
        .my-enter,
        .my-leave-to {
            opacity: 0;
            transform: translateY(150px);
        }

        .my-enter-active,
        .my-leave-active {
            transition: all 0.8s ease;
        }
- 效果效果如下
使用第三方 CSS 动画库
- 导入动画类库:
<link rel="stylesheet" type="text/css" href="./lib/animate.css" rel="nofollow noopener" >
- 定义 transition 及属性:
<transition
    enter-active-class="fadeInRight"
    leave-active-class="fadeOutRight"
    :duration="{ enter: 500, leave: 800 }">
    <div class="animated" v-show="isshow">动画哦</div>
</transition>
使用动画钩子函数
- 定义 transition 组件以及三个钩子函数:
<div id="app">
    <input type="button" value="切换动画" @click="isshow = !isshow">
    <transition
    @before-enter="beforeEnter"
    @enter="enter"
    @after-enter="afterEnter">
      <div v-if="isshow" class="show">OK</div>
    </transition>
  </div>
- 定义三个 methods 钩子方法:
methods: {
        beforeEnter(el) { // 动画进入之前的回调
          el.style.transform = 'translateX(500px)';
        },
        enter(el, done) { // 动画进入完成时候的回调
          el.offsetWidth;
          el.style.transform = 'translateX(0px)';
          done();
        },
        afterEnter(el) { // 动画进入完成之后的回调
          this.isshow = !this.isshow;
        }
      }
- 定义动画过渡时长和样式:
.show{
      transition: all 0.4s ease;
    }
v-for 的列表过渡
案例——动画效果列表
- 定义过渡样式:
<style>
        li {
            border: 1px dashed #999;
            margin: 5px;
            line-height: 35px;
            padding-left: 5px;
            font-size: 12px;
            width: 100%;
        }

        li:hover {
            background: deeppink;
            transition: all 1s ease
        }

        .v-enter,
        .v-leave-to {
            opacity: 0;
            transform: translateY(80px)
        }

        .v-enter-active,
        .v-leave-active {
            transition: all 1s ease
        }

        .v-move {
            transition: all 0.6s ease
        }

        .v-leave-active {
            position: absolute;
        }
    </style>
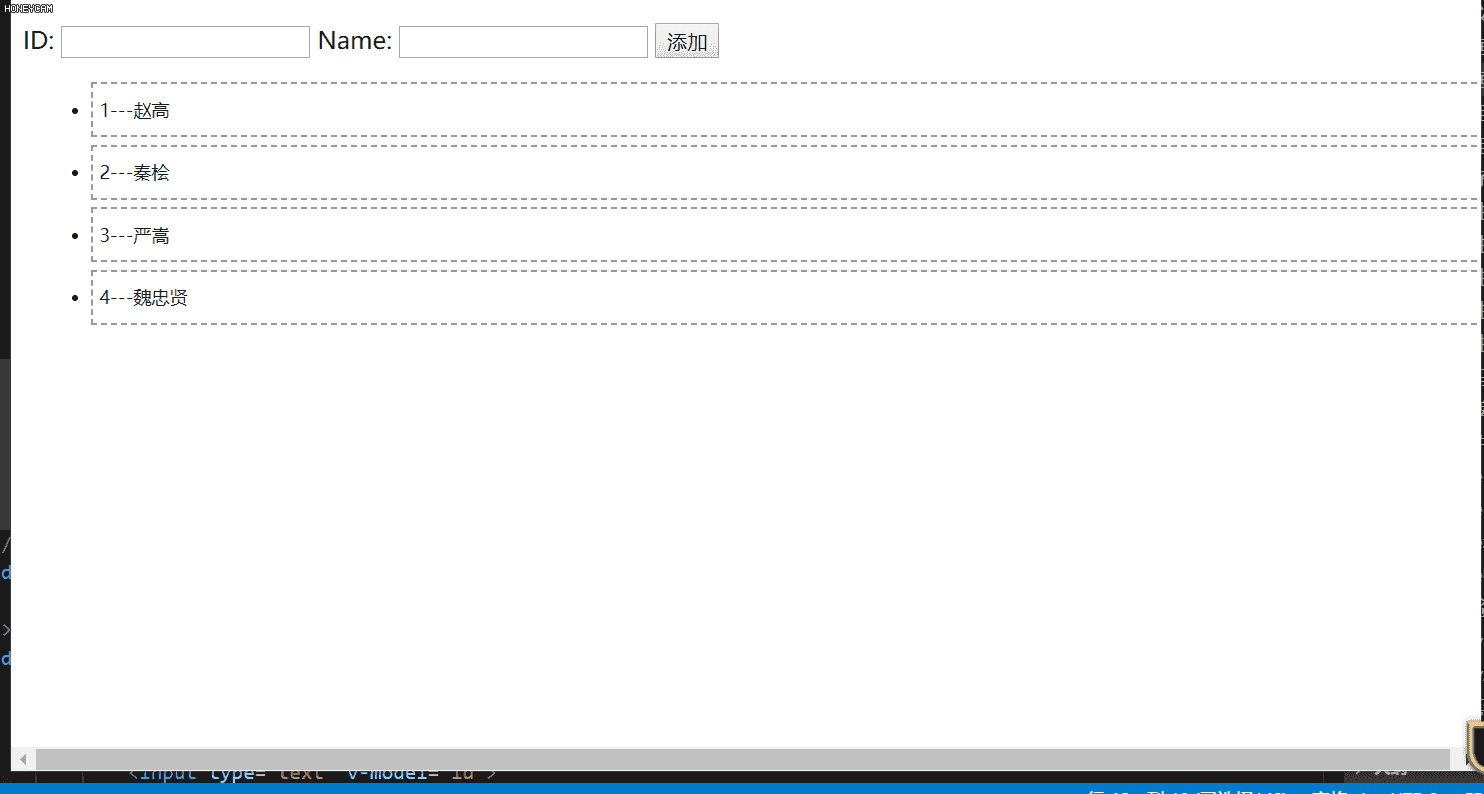
- 定义DOM结构,其中,需要使用 transition-group 组件把v-for循环的列表包裹起来:
  <div id="app">
        <div>
            <label>
                ID:
                <input type="text" v-model="id">
            </label>
            <label>
                Name:
                <input type="text" v-model="name">
            </label>
            <label>
                <input type="button" value="添加" @click="add">
            </label>
        </div>

        <transition-group appear tag="ul">
            <li v-for="(item,i) in list" :key="item.id" @click="del(i)">
                {{item.id}}---{{item.name}}
            </li>
        </transition-group>

    </div>
- 定义 VM中的结构:
    // 创建 Vue 实例,得到 ViewModel
        var vm = new Vue({
            el: '#app',
            data: {
                id: '',
                name: '',
                list: [{
                    id: 1,
                    name: '赵高'
                }, {
                    id: 2,
                    name: '秦桧'
                }, {
                    id: 3,
                    name: '严嵩'
                }, {
                    id: 4,
                    name: '魏忠贤'
                }]
            },
            methods: {
                add() {
                    this.list.push({
                        id: this.id,
                        name: this.name
                    })
                    this.id = this.name = ""
                },
                del(i) {
                    this.list.splice(i, 1)
                }
            }
        })
4.实现效果
列表的排序过渡
<transition-group> 组件还有一个特殊之处。不仅可以进入和离开动画,还可以改变定位。要使用这个新功能只需了解新增的 v-move 特性,它会在元素的改变定位的过程中应用。
+ v-move 和 v-leave-active 结合使用,能够让列表的过渡更加平缓柔和:
.v-move {
            transition: all 0.6s ease
        }

        .v-leave-active {
            position: absolute;
        }
案例——vue-resouce品牌管理
实现将数据上传至服务器,获取服务器里面的数据,删除服务器数据
分析:
1. 由于已经导入了 Vue-resource这个包,所以 ,可以直接通过 this.$http 来发起数据请求
2. 根据接口API文档,知道,获取列表的时候,应该发起一个 get 请求
3. this.$http.get('url').then(function(result){})
4. 当通过 then 指定回调函数之后,在回调函数中,可以拿到数据服务器返回的 result
5. 先判断 result.status 是否等于0,如果等于0,就成功了,可以 把 result.message 赋值给 this.list ; 如果不等于0,可以弹框提醒,获取数据失败!
添加品牌列表到后台服务器
分析:
1. 听过查看 数据API接口http://www.liulongbin.top:3005/api/post,发送一个 Post 请求, this.$http.post
2. this.$http.post() 中接收三个参数:
2.1 第一个参数: 要请求的URL地址
2.2 第二个参数: 要提交给服务器的数据 ,要以对象形式提交给服务器 { name: this.name }
3.3 第三个参数: 是一个配置对象,要以哪种表单数据类型提交过去, { emulateJSON: true }, 以普通表单格式,将数据提交给服务器application / x - www - form - urlencoded
3. 在 post 方法中,使用 .then 来设置成功的回调函数,如果想要拿到成功的结果,需要 result.body
## 案例代码
<!DOCTYPE html>
<html lang="en">
<head>
<meta charset="UTF-8">
<meta name="viewport" content="width=device-width, initial-scale=1.0">
<meta http-equiv="X-UA-Compatible" content="ie=edge">
<title>Document</title>
<script src="./lib/vue-2.4.0.js"></script>
<script src="./lib/vue-resource-1.3.4.js"></script>
<link rel="stylesheet" href="./lib/bootstrap-3.3.7.css" rel="nofollow noopener" >
</head>
<body>
<div id="app">
<div class="panel panel-primary">
<div class="panel-heading">
<h4 class="panel-title">添加品牌</h4>
</div>
<div class="panel-body form-inline">
<label>
Name:
<input type="text" v-model="name" class="form-control">
</label>
<input type="button" value="添加" @click="add" class="btn btn-primary">
</div>
</div>
<table class="table table-bordered table-hover table-striped">
<thead>
<tr>
<th>Id</th>
<th>Name</th>
<th>Ctime</th>
<th>Operation</th>
</tr>
</thead>
<tbody>
<tr v-for="item in list" :key="item.id">
<td>{{item.id}}</td>
<td>{{item.name}}</td>
<td>{{item.ctime}}</td>
<td>
<a href="" rel="nofollow noopener" @click.prevent="del(item.id)">删除</a>
</td>
</tr>
</tbody>
</table>
</div>
<script>
// 如果我们通过全局配置了,请求的数据接口 根域名,则 ,在每次单独发起 http 请求的时候,请求的 url 路径,应该以相对路径开头,前面不能带 / ,否则 不会启用根路径做拼接;
Vue.http.options.root = 'http://vue.studyit.io/';
// 全局启用 emulateJSON 选项
Vue.http.options.emulateJSON = true;
// 创建 Vue 实例,得到 ViewModel
var vm = new Vue({
el: '#app',
data: {
name: '',
list: [ // 存放所有品牌列表的数组
]
},
created() { // 当 vm 实例 的 data 和 methods 初始化完毕后,vm实例会自动执行created 这个生命周期函数
this.getAllList()
},
methods: {
getAllList() { // 获取所有的品牌列表
// 分析:
// 1. 由于已经导入了 Vue-resource这个包,所以 ,可以直接通过 this.$http 来发起数据请求
// 2. 根据接口API文档,知道,获取列表的时候,应该发起一个 get 请求
// 3. this.$http.get('url').then(function(result){})
// 4. 当通过 then 指定回调函数之后,在回调函数中,可以拿到数据服务器返回的 result
// 5. 先判断 result.status 是否等于0,如果等于0,就成功了,可以 把 result.message 赋值给 this.list ; 如果不等于0,可以弹框提醒,获取数据失败!
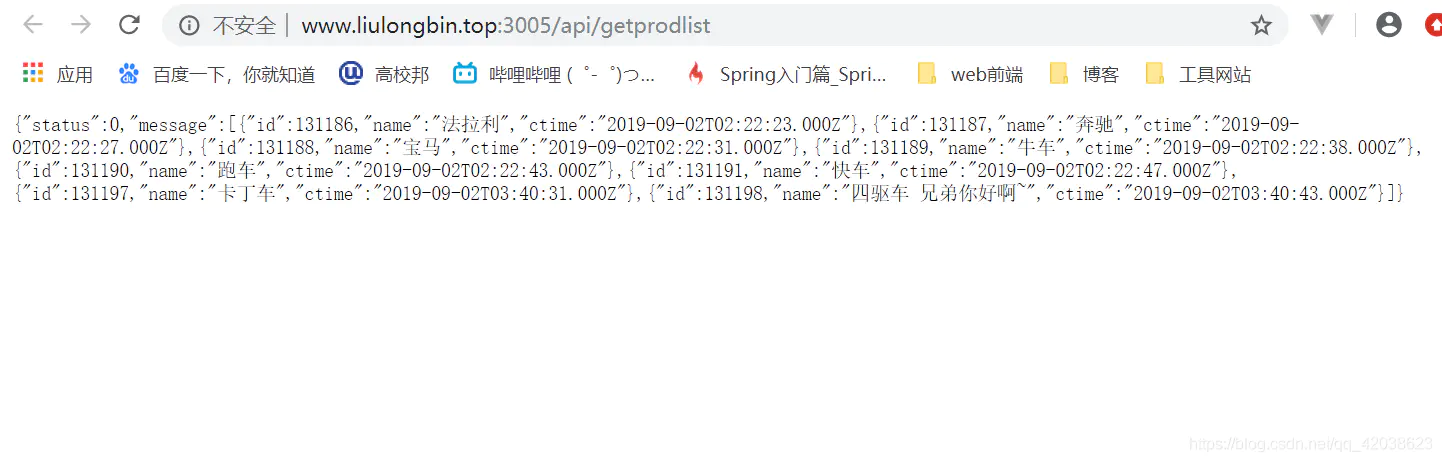
this.$http.get('api/getprodlist').then(result => {
// 注意: 通过 $http 获取到的数据,都在 result.body 中放着
var result = result.body
if (result.status === 0) {
// 成功了
this.list = result.message
} else {
// 失败了
alert('获取数据失败!')
}
})
},
add() { // 添加品牌列表到后台服务器
// 分析:
// 1. 听过查看 数据API接口,发现,要发送一个 Post 请求, this.$http.post
// 2. this.$http.post() 中接收三个参数:
// 2.1 第一个参数: 要请求的URL地址
// 2.2 第二个参数: 要提交给服务器的数据 ,要以对象形式提交给服务器 { name: this.name }
// 3.3 第三个参数: 是一个配置对象,要以哪种表单数据类型提交过去, { emulateJSON: true }, 以普通表单格式,将数据提交给服务器 application/x-www-form-urlencoded
// 3. 在 post 方法中,使用 .then 来设置成功的回调函数,如果想要拿到成功的结果,需要 result.body
/* this.$http.post('api/addproduct', { name: this.name }, { emulateJSON: true }).then(result => {
if (result.body.status === 0) {
// 成功了!
// 添加完成后,只需要手动,再调用一下 getAllList 就能刷新品牌列表了
this.getAllList()
// 清空 name
this.name = ''
} else {
// 失败了
alert('添加失败!')
}
}) */
this.$http.post('api/addproduct', {
name: this.name
}).then(result => {
if (result.body.status === 0) {
// 成功了!
// 添加完成后,只需要手动,再调用一下 getAllList 就能刷新品牌列表了
this.getAllList()
// 清空 name
this.name = ''
} else {
// 失败了
alert('添加失败!')
}
})
},
del(id) { // 删除品牌
this.$http.get('api/delproduct/' + id).then(result => {
if (result.body.status === 0) {
// 删除成功
this.getAllList()
} else {
alert('删除失败!')
}
})
}
}
});
</script>
</body>
</html>
实现效果
-Nickの博客")
数据来自服务器